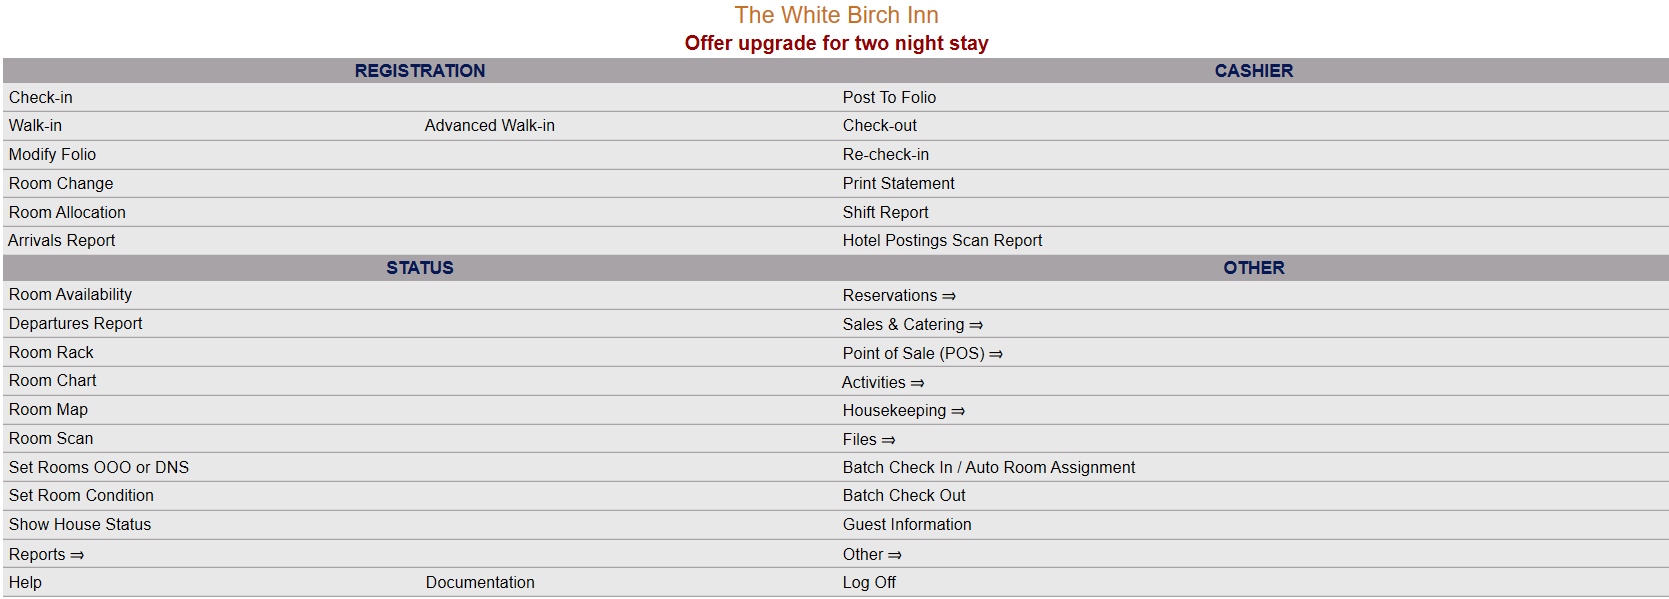
Click the icon on the left, or the breadcrumb words "Full Menu" on the top right of the screen to open the Full Menu.
![]()
This will display the Full menu in a tabular form, with four sections, Registration, Status, Cashier and Other.
The section on the bottom right is the Other area.
Select Files => from the Other section.
The Files Menu is divided into two sections, Files List 1 and Files List 2.
Select Condos => from the Files List 1 section.
The Condos Menu is divided into two section, General and Reports.
Select Condo Statements from the General section.
OR
Select the Statements button from the local tool bar on the Condo Owners screen:
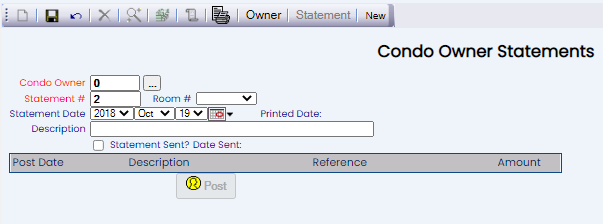
When selected, the Condo Owner Statements screen will open.
When the Condo Owner Statement screen is opened, a list of configured condo owners statements for your Property appears on the left, with the details about a selected condo owner statement appearing in the main area of the screen. Any changes made on the right, once saved, will be updated in the listings to the left.
Configured statement entries may be listed by:
First Name: The first name of the condo owner.
Last Name: The last name of the condo owner.
Room #: The condo units assigned number.
State #: The condo owner statement assigned number.
Date: The date assigned to the statement; by default the date that the statement was generated.
Balance: The balance due on the statement
Sent?: Has this statement been sent? This option is yes or no and will therefore always have an entry in the field.
Description: Any description entered for the statement will be shown here.
Selecting any condo owner statement entry on the left will display the details on the right.
Your options include the following:
Generate a new entry:
Click the New ![]() button from the toolbar to add a new condo owner statement.
button from the toolbar to add a new condo owner statement.
Complete the fields described below.
OR:
Select an existing condo owner statement from the list on the left, and click the Replicate ![]() button from the toolbar. Then change the field information as described below.
button from the toolbar. Then change the field information as described below.
Edit the current selection:
Change the field information described below.
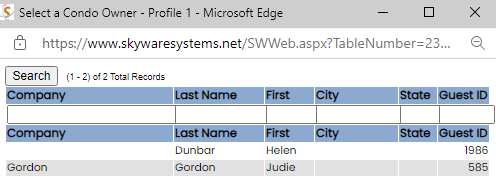
Condo Owner: Enter the guest ID number for the Condo Owner in this field. You may type directly into the field, or click the gray box next to the field to open a new screen listing all records designated as condo owners at your property to select from. When the statement is saved, the name of the condo owner will appear alongside the ID field.
Selecting an entry will automatically complete the ID field for you, and close the pop-up window.
Note: IF you entered this screen using the Statements button from the local tool bar on the Condo Owners screen, the ID number of the specific condo owner will be automatically entered for you. You may however change the ID number to that of another condo owner if desired. Be aware: entering the ID number for an account NOT designated as a condo owner will result in an error message pop-up appearing when you attempt to save the statement.
The Condo Statement screen will also display the error message "Validation Error - Invalid Condo Owner" to help alert you to the fact that the ID entered is not recognized as belonging to a condo owner. This helps prevent the generation of statements not attached to an actual condo owner. It is recommended that you use the ID selection pop-up window to prevent this error.
This field is required.
Statement #: Statements are issued in sequential order (1, 2, 3... etc). The number in this field is the next number in sequence to be issued for the statements generated. This helps prevent duplication of statements. You may however change the statement number to another number if desired. Be aware: entering a number for a statement that has already been used (even for a different condo owner), will result in an error message pop-up appearing when you attempt to save the statement.
The Condo Statement screen will also display the error message "Unable to Save - Duplicate Statement Number!" to help alert you to the fact that the statement number has already been assigned to a different statement.
This field is required.
Room #: Select the condo room number. This is a drop-down menu of available room numbers. Select the appropriate one. (Any room may be designated as a condo, and condo owners may own multiple condo units, and therefore require separate statements for each unit).
Statement Date: Enter the desired date for the statement using the using the drop-down menus for year, month and day or the calendar icon. By default today's date is entered.
Printed Date: After the statement has been printed, the date it was printed will appear in this field. This field cannot be edited manually; only if a statement has been printed will a date appear here.
Note: To print a condo owner statement, simply click the "Statement" button in the local tool bar to open the statement report in a separate screen, and print out the report. The Condo Statement format used will be unique to your Property and should be generated using the Condo Statements command (found in the Documents section of the Other Front Desk Tasks menu). See How to Create or Customize your Documents for more details.
Description: Enter the description of this statement here. Type manually in the field.
Statement closed?: This box may be checked or unchecked. When a statement is to be closed, check this box.
Note: A closed statement can no longer be posted to. Subsequent posting will need to be made to another statement.
Date closed: Similar to the Printed Date field, once the statement closed box has been checked and the change has been saved, this field will be automatically completed. This field cannot be edited manually; only if a statement has been marked as being closed will a date appear here.
Note: Using the Condo Configuration screen, you can assign a cutoff date (first day of month, last day of month, or daily) for all generated open condo statements to be closed out. During Night Audit on the selected cutoff date any open statement(s) will be automatically closed. This will also automatically check the Statement closed? check box and complete the Date closed field, so that it is clear that the statement has been closed.
Once the statement information has been entered, click the Save button (![]() ) in the local tool bar.
) in the local tool bar.
Once a statement has been saved for the first time, generating the statement entry, (which will appear on the left side of the screen) the Posting section for the statement will become live.
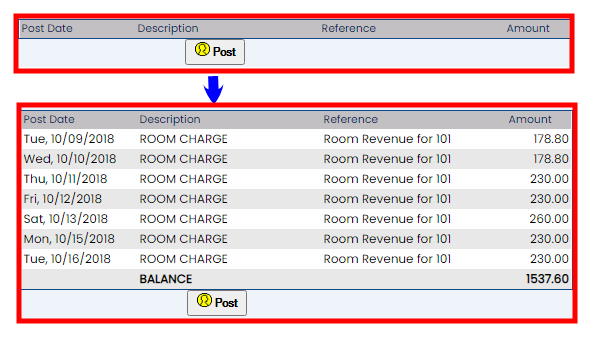
To post an entry to a statement, click on the Post button.
Note: Postings may be made to OPEN statements only. Once closed, statements may not be added to.
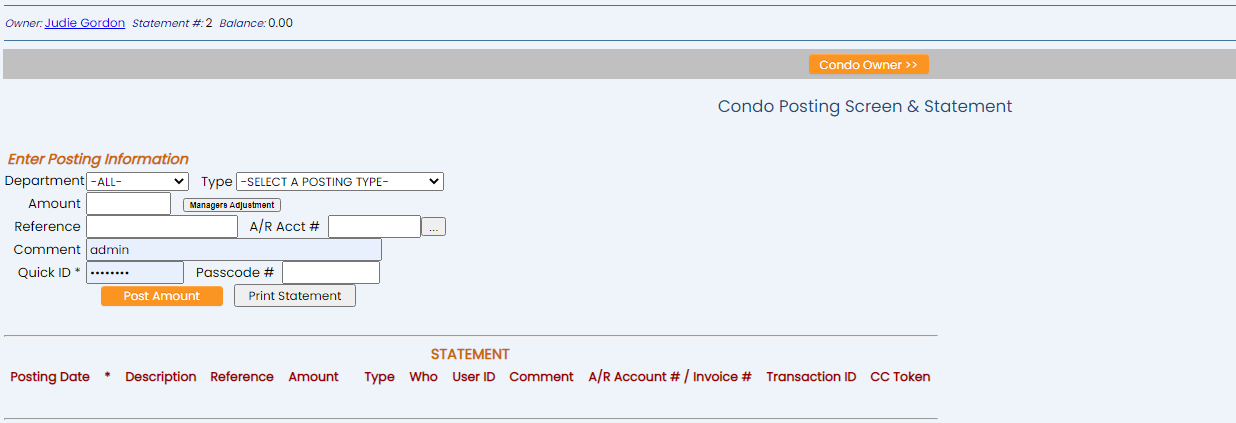
This will open the Condo Posting Screen & Statement screen.
The condo owners name, statement number that the postings entered here will be attached to, and the current balance of the statement are shown at the top of the screen.
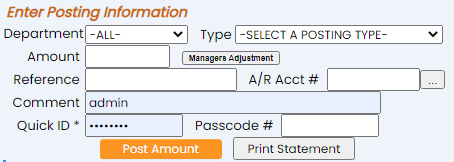
Enter the Posting information. This includes the department the charge was generated from, the type of posting, and the actual amount:
Department: This is a drop-down menu of options. Select the appropriate one or leave as -ALL-. These can include options such as Gift shop, Spa, or Tax. Posting departments are a means of reducing the extremely large potential list of posting types into more manageable groupings.
Note: The following Post Departments come standard with your Skyware Systems system at install: Room, Tax, Payment, and Deposit. You can alter these or add others for your property in the Property and System Configuration area. See Property and System Configuration Overview for more details
Type: This is a drop-down menu of options. Select the appropriate one. Posting Types or Posting Codes are used to post charges to guests or group folio accounts. These can include options such as massage, room charge, or parking.
Note: The Skyware PMS System comes standard with a room charge (post type 100 which cannot be deleted), taxes, and deposit and payment post types (payment and deposit types must be separate for reporting purposes). Unlimited additional post types can be added.
Amount: This is the amount of the charge or credit posted to the Folio. Enter the amount into the field.
Manager's adjustment: If this button is clicked, you will get the option to select either normal, credit or charge for the amount shown (if you have the authorization to do so). To make a Managers Adjustment, click the Managers Adjustment button, select the Post Type that you wish to make the manager adjustment against, enter the amount, check whether it is a Credit (negative amount on the guests folio) or a Charge (positive amount on the guests folio), enter a reference and comment and click the Post Amount button.
Reference: Enter a reference if required . This will be based on your Property's standard operating procedures (SOPs). A reference could be for example a Check Number. The reference will be printed on the guest receipt, and cannot be changed once posted.
A/R Acct #: Accounts/Receivable. This is a direct billing account. This may also sometimes be called a City ledger (C/L). Use this if the posting is being billed directly to a Company. If posting to one, enter the number in the field or the search icon may be used to open up a pop-up window containing all the available Accounts and allow you to select the appropriate one.
Comment: This will be based on your Property's standard operating procedures (SOPs). This may be anything you wish or left blank. The comment will be printed on the guest receipt, and cannot be changed once posted.
Quick ID *: For Properties using the Quick ID, this is required for any posting types displaying an asterisk (*). These will typically be payments or deposits.
Passcode: Enter a passcode if required. This will be based on your Property's standard operating procedures (SOPs).
Click the orange button "Post Amount" to post the entered amount to the statement. All postings made to the condo statement will be shown in this section.
When ready, click the orange button "Condo Owner >>" at the top of the screen to return to the Condo Statement screen. The added postings will now be shown in the Posting section on the right side of the screen.
Repeat this process for any open statements you wish to generate/edit.
Note: If a posting to a condo owner (such as a room charge or an invoice) has been made, but has NOT yet been attached to an open condo owner statement, during the night audit process the posting will be AUTOMATICALLY added to the open statement. If no open statement is available, a statement will be automatically generated for the posting (with a new statement number) to be posted to, appearing in the condo owner statement screen list the following day.
